Monday 15 April 2024

Sweetly Sentimental


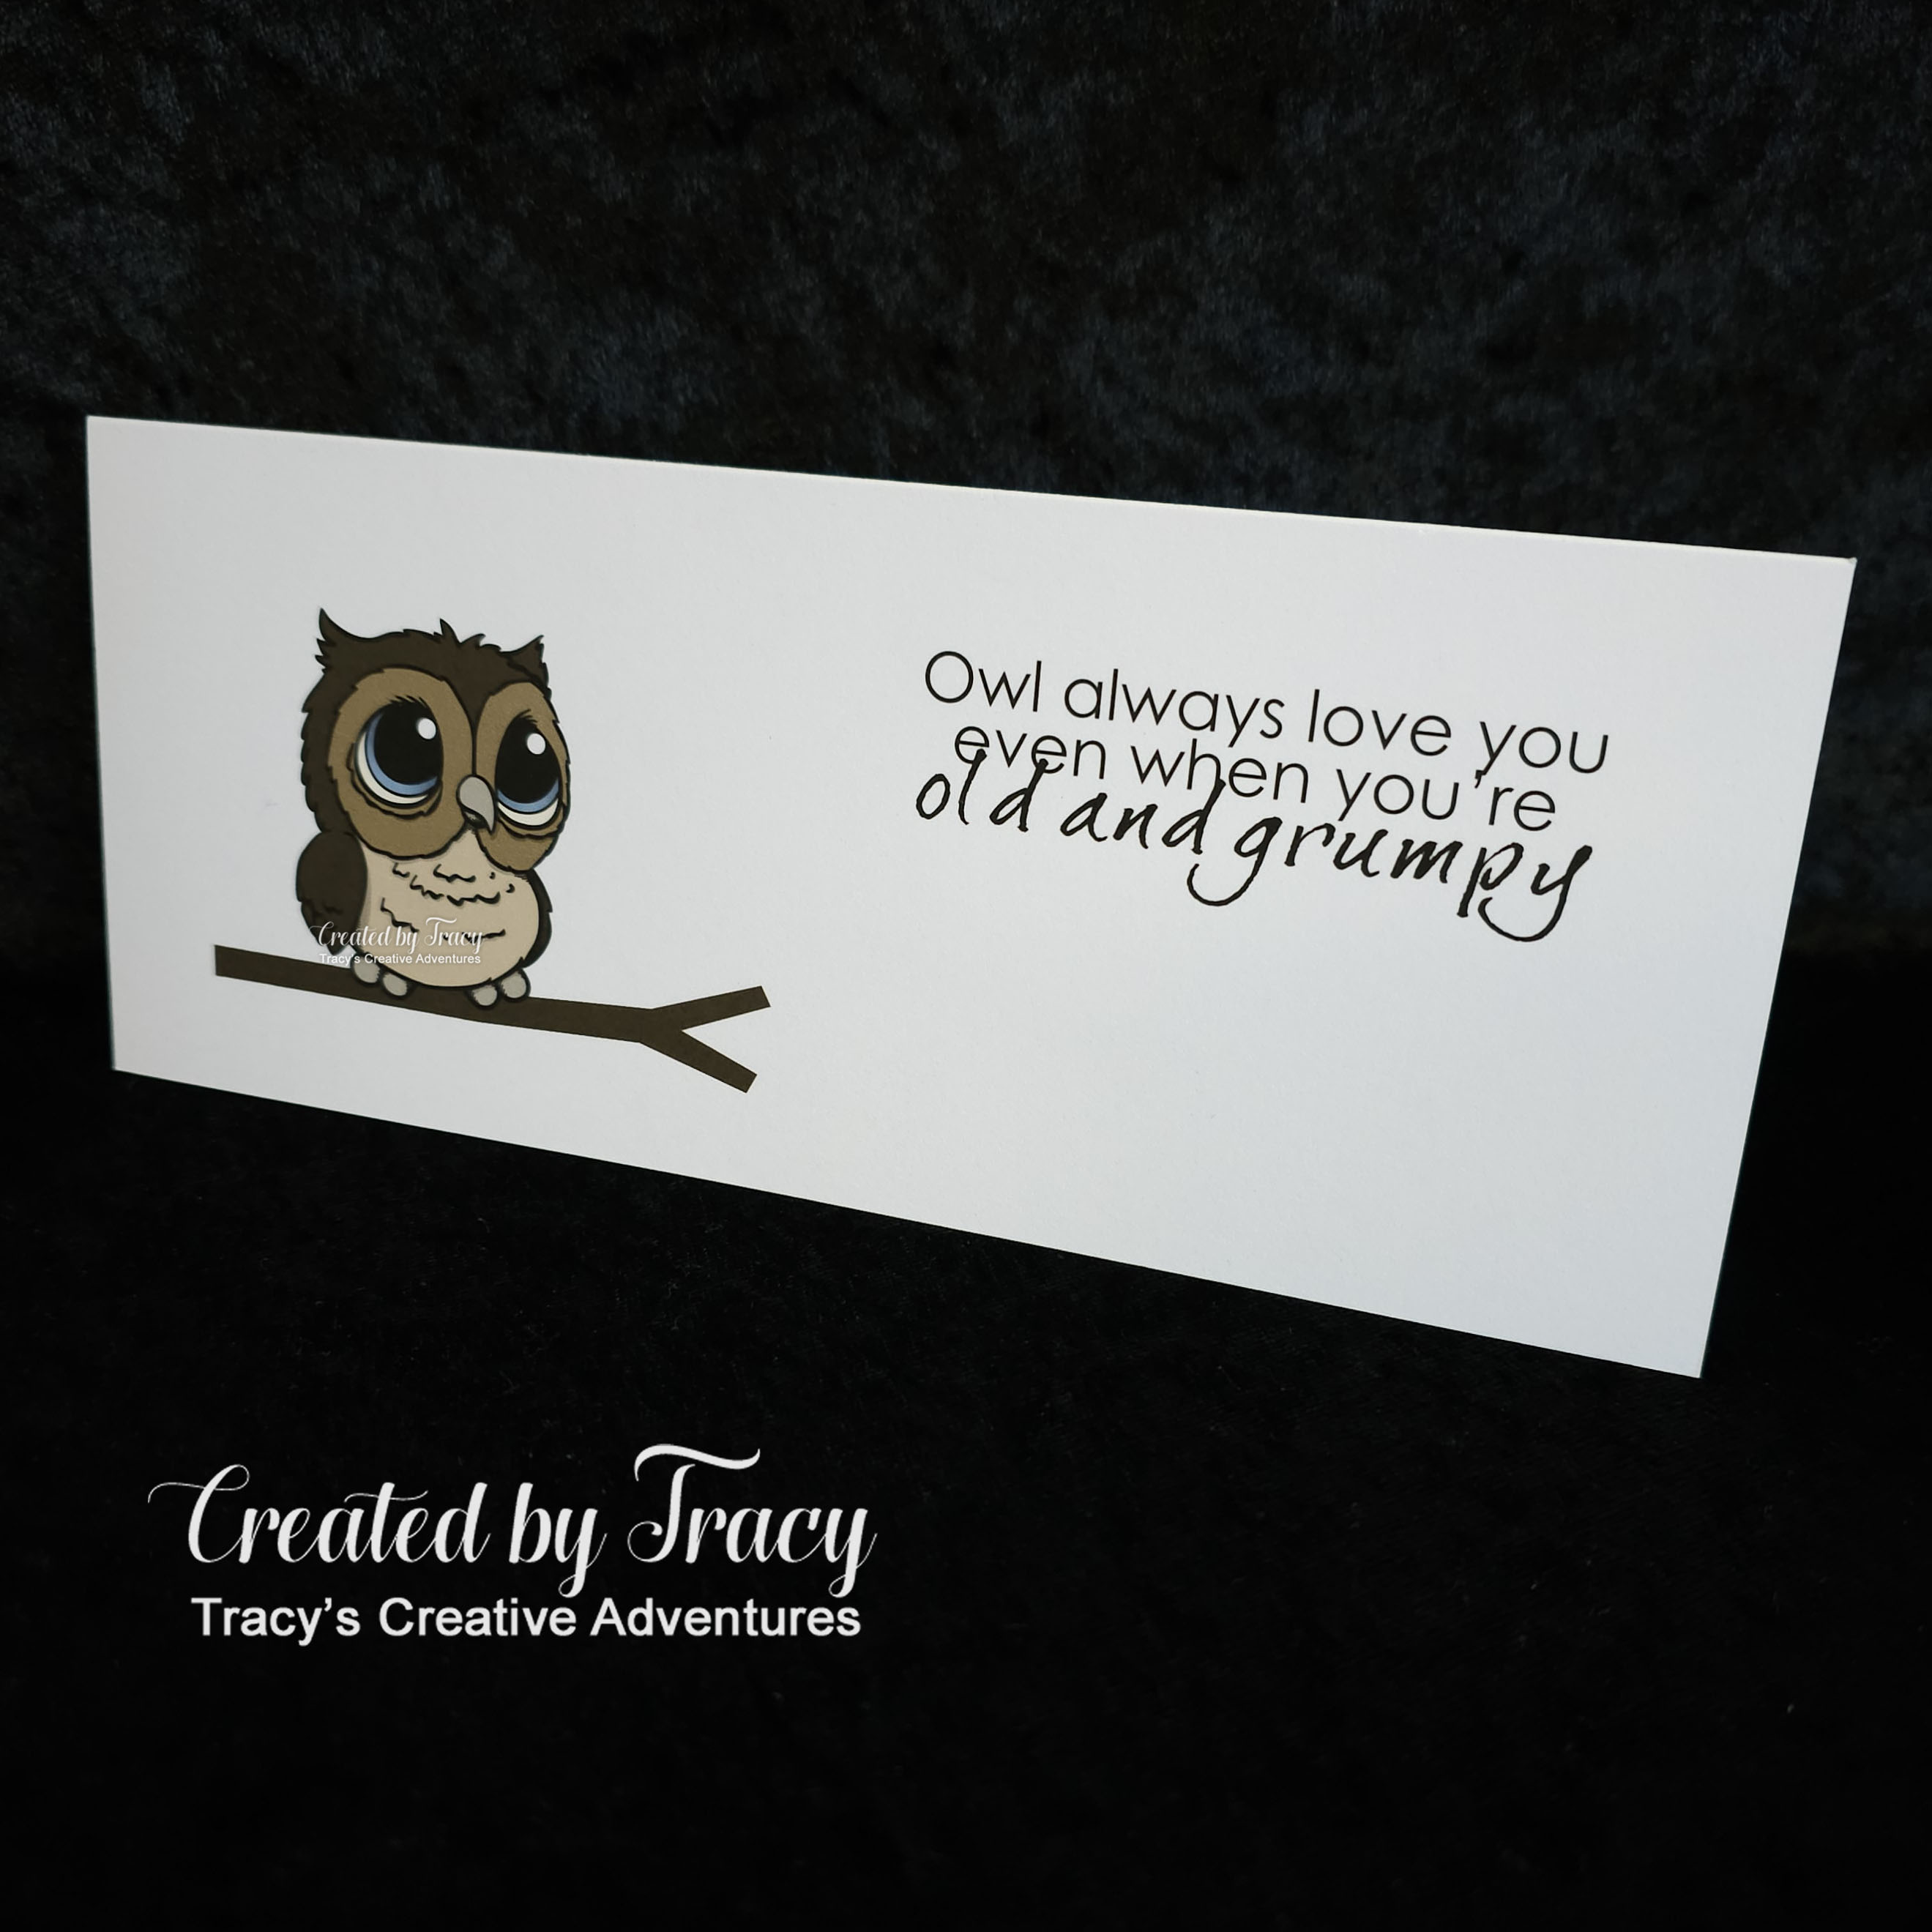
This is my second quirky card for the day.  It also uses the cute "You're A Hoot" digital stamp set from the Beccy's Place Store.  I combined the "Ophelia" pre-coloured digital stamp with the "Old and Grumpy" digital sentiment from the same digital stamp set.

I opened the "Ophelia" pre-coloured digital stamp in Silhouette Studio and sized the image to fit neatly on the front of a landscape slimline card (8 1/2" wide x 3 1/2" tall).
I perched her on a branch from the Bird On Branch cut file (see ingredients), then added the "Old and Grumpy" digital sentiment from the same digital stamp set.
I printed the image-sentiment panel on smooth white 300gsm Letter sized cardstock, scored at 3 1/2", folded, burnished the fold, then trimmed off the excess cardstock to finish my sweetly sentimental slimline card ... the older I get, the more I appreciate quirky sentiments like these.


This is such a fun set, so of course there will be more to come using the assorted images and sentiments.  My first card from the "You're A Hoot" digital stamp set used the "Augustus" pre-coloured digital stamp, along with the same sentiment, giving me a "his" and "her" version.
You can read all about it HERE


~~~*~~~*~~~
INGREDIENTS
You're A Hoot digital set from the Beccy's Place store
"Ophelia" pre-coloured digital stamp
and "Old and Grumpy" digital sentiment
This digital stamp set is now retired but you can see
projects created using it HERE on the Beccy's Place Blog
Bird On Branch by Lori Whitlock
smooth white 300gsm cardstock
scoreboard & bone folder - to form top fold of card
sharp craft knife + self healing cutting mat + steel ruler
- for cutting image panel to form card

~~~*~~~*~~~
I have entered my card in the following challenges:

Old and Grumpy


My slimline card uses the cute "You're A Hoot" digital stamp set from the Beccy's Place Store.  I combined the "Augustus" pre-coloured digital stamp with the "Old and Grumpy" digital sentiment from the same digital stamp set.  Although this is a new-to-me stamp set, it is retired from the Beccy's Place Store, it was a recent "48hrs of Throwback Thursday" purchase.  I'm so glad I did, as it's a fun set and wonder how I missed it, given that I've been a fan of Beccy's designs for so many years.
=> HIGHLY recommend that you become a follower of the Beccy's Place Blog
... apart from being inspired while seeing Beccy's stamps in action,
Beccy shares fabulous techniques and tutorials, introduces new releases,
and occasionally gives access to retired images

I opened the "Augustus" pre-coloured digital stamp in Silhouette Studio and sized the image to fit neatly on the front of a landscape slimline card (8 1/2" wide x 3 1/2" tall).
I perched him on a branch from the Bird On Branch cut file (see ingredients), then added the "Old and Grumpy" digital sentiment from the same digital stamp set.
I printed the image-sentiment panel on smooth white 300gsm Letter sized cardstock, scored at 3 1/2", folded, burnished the fold, then trimmed off the excess cardstock to finish my sweetly sentimental slimline card ... the older I get, the more I appreciate quirky sentiments like these.


This is such a fun set, so of course there will be more to come using the assorted images and sentiments.  I've already made a second card from the "You're A Hoot" digital stamp set, it uses the "Ophelia" pre-coloured digital stamp, along with the same sentiment, giving me a "his" and "her" version.
You can read all about it HERE


~~~*~~~*~~~
INGREDIENTS
You're A Hoot digital set from the Beccy's Place store
"Augustus" pre-coloured digital stamp
and "Old and Grumpy" digital sentiment
This digital stamp set is now retired but you can see
projects created using it HERE on the Beccy's Place Blog
Bird On Branch by Lori Whitlock
smooth white 300gsm cardstock
scoreboard & bone folder - to form top fold of card
sharp craft knife + self healing cutting mat + steel ruler
- for cutting image panel to form card

~~~*~~~*~~~
I have entered my card in the following challenges:

Sunday 31 March 2024

Just want cake?


 No, you're not seeing things,
it's Kenneth the Flockstar again.

I already shared a card made using the fun new Flockstar digital stamp set from the Beccy's Place Store.  I combined the "Kenneth" pre-coloured digital stamp with the "Love Cake" digital sentiment from the same digital stamp set.  To make this 6" square card I mirrored the Kenneth image and matted the sentiment panel to match the card matting ... two cards same-but-different.

You can read all about my first "Kenneth the Flockstar" card HERE


~~~*~~~*~~~
INGREDIENTS
Flockstar digital set from the Beccy's Place store
textured cardstock - American Crafts
sharp craft knife + self healing cutting mat + steel ruler
- for cutting image panel and matting layers
Helmar 450 Quick Dry -
liquid adhesive - to adhere the layers

~~~*~~~*~~~
I have entered my cards in the following challenges:

Kenneth the Flockstar

My 6" square card uses the fun new Flockstar digital stamp set from the Beccy's Place Store.  I combined the "Kenneth" pre-coloured digital stamp with the "Love Cake" digital sentiment from the same digital stamp set.

This is such a fun set, so of course there will be more to come using the assorted images and sentiments.  The next card uses Kenneth again, the image is mirrored and the sentiment matted.
You can read all about it HERE


~~~*~~~*~~~
INGREDIENTS
Flockstar digital set from the Beccy's Place store
textured cardstock - American Crafts
sharp craft knife + self healing cutting mat + steel ruler
- for cutting image panel and matting layers
Helmar 450 Quick Dry -
liquid adhesive - to adhere the layers

~~~*~~~*~~~
I have entered my cards in the following challenges:

Friday 23 February 2024

My Favourites . . . for a Special Birthday

 This special card combines several of my favourites:
- birthday celebrations
- sparkle
- aqua-coral colour combo
- pre-coloured digital stamps
- layers
... and lucky last, family
I love to personalise cards and as our niece is studying science at university,
this image of a cute scientist with her experiment bubbling away
seemed to be the perfect choice to celebrate her special day.


This card uses the Love Is Chemistry digital stamp from the The Paper Shelter.  I opened the pre-coloured digital stamp in Silhouette Studio and sized it to 5" square then printed on textured cardstock.  I trimmed the image panel down to size, adhered to Scuba weave cardstock, then trimmed to a 1/16" matting layer with a Perfect Layers Ruler.  I cut a 6" panel of Rose weave cardstock, adhered to a 6" card base, then adhered the matted image panel on top.  The matting layers add nice dimension and the colours complement the image perfectly.

Next came the sparkle.  Making our 2023 Christmas cards reignited my love of using Wink of Stella Glitter Brushes.  I used the White brush to add sparkle to the pink chemical and hearty steam bubbling away and the Clear brush to add sparkle to all the other chemicals.  It's such a delicate sparkle and mess free, no chunks of glitter falling off and spreading sparkle everywhere but where you want it.


I matted a panel for the birthday sentiment inside the card too.


~~~*~~~*~~~
INGREDIENTS
Love Is Chemistry digital stamp from the The Paper Shelter
Scuba & Rose weave cardstock - Kaisercraft
sharp craft knife + self healing cutting mat + steel ruler
- for cutting image panel and 6" matting layer
Perfect Layers Ruler - to trim 1/16" matting layers
6" square card base
Helmar 450 Quick Dry
- liquid adhesive - to adhere the layers
Wink of Stella Clear Glitter Brush
- to add delicate sparkle

~~~*~~~*~~~
I have entered my card in the following challenges:


Wednesday 31 January 2024

One day at a time, together

 Today I have used the Stem In A Teacup digital set
from the Beccy's Place Store to make some special cards.


I designed my cards in Silhouette Studio (no, I didn't use it to cut but it's a handy program to size and design cards and card elements), starting with the Stem In A Teacup digital set from the Beccy's Place Store.  I used the "Wild Rose" pre-coloured digital stamp and combined it with the "one day at a time" digital sentiment from the same set.  My cards are slimline style, so I sized an image panel to 8 1/2" wide x 3 1/2" tall.  

I duplicated and mirrored the image to create my design, an image on each side, with the sentiment in the middle between them.  I added "together" to the sentiment as the cards are going to some couples still going through tough times from the 2022 floods.  I printed the image panel on 300gms smooth white cardstock, scored, folded, then trimmed to size.


~~~*~~~*~~~
INGREDIENTS
Stem In A Teacup digital set from the Beccy's Place store
"together" sentiment - Caramello Font - Creative Fabrica
300gsm smooth white cardstock - to print card
scoreboard & bone folder - to create top folding card
sharp craft knife + self healing cutting mat + steel ruler
- for cutting the card

~~~*~~~*~~~
I have entered my cards in the following challenges:
My "F" is Flowers

One day at a time . . .

  Today I had some fun making some cards
using the Stem In A Teacup digital set from the Beccy's Place Store.


I designed my cards in Silhouette Studio (no, I didn't use it to cut but it's a handy program to size and design cards and card elements), starting with the Stem In A Teacup digital set from the Beccy's Place Store.  I used the "Wild Rose" pre-coloured digital stamp and combined it with the "one day at a time" digital sentiment from the same digital stamp set.  As I was making two cards, I duplicated and mirrored the image, so that my two cards are the-same-but-different.  I sized the image panels to 5 1/2" square, added the images and sentiments and they were ready to print.  I printed the image panels on white textured cardstock, trimmed to size, matted with green cardstock, trimmed to 1/16" border with a Perfect Layers Ruler, adhered to 6" square white cardstock panels, then adhered to top folding card bases.


~~~*~~~*~~~
INGREDIENTS
Stem In A Teacup digital set from the Beccy's Place store
white & green textured cardstock - American Crafts
sharp craft knife + self healing cutting mat + steel ruler
- for cutting image panel
Perfect Layers Ruler - to trim 1/16" matting layers
Helmar 450 Quick Dry -
liquid adhesive - to adhere the layers

~~~*~~~*~~~
I have entered my cards in the following challenges:
My "F" is Flowers

Sunday 31 December 2023

Have yourself a Merry Little Christmas


My wide slimline cards with a trio of jingle bells started in Silhouette Studio.
I opened the "Single Bell" pre-coloured digital stamp and "Merry Little Christmas" digital sentiment from the Jingle Bell digital stamp set by Beccy’s Place.  I replicated the bells so that I had three to work with, I sized them all differently and flipped one so that the bow was facing opposite the others.  I arranged the bells at different heights and sized sentiment to fit nicely together on a 7 3/4" x 2 3/4" panel to go on the front of a slimline card base.  I printed the panel on smooth white cardstock and trimmed to size.  I matted the panel with crimson textured cardstock, trimmed to a 1/16" border
with a Perfect Layers Ruler.  I created the slimline card bases from 300gsm smooth white cardstock.  I printed a single bell and sentiment to finish off the inside of each card, scoring, folding and trimming to size.  The matted image panels were adhered to the card bases.  One last thing was needed to finish it off, a magical touch of sparkle with a Clear Wink of Stella Glitter Brush to all the bells, inside and out.


I love the delicate sparkle from Wink of Stella
but it's so hard to capture it in photos ...
trust me, it's there and it twinkles in the light from all angles.


Having the sentiment printed on the inside of each card made it much easier,
a nice sparkling jingle bell accent, a cheery greeting and a lot less hand writing for me.


~~~*~~~*~~~
INGREDIENTS

I used the following elements from the set:
Single Bell - pre-coloured digital stamp
Merry Little Christmas – digital sentiment
300gsm smooth white - to print the image panel
crimson textured cardstock - for the matting layer
300gsm smooth white Letter cardstock - to make the card base
scoreboard & bone folder - to score and burnish the card fold
Helmar 450 Quick Dry - to adhere the layers
Clear Wink of Stella Glitter Brush - to add sparkle to the bell

~~~*~~~*~~~
I have entered my cards in the

Saturday 2 December 2023

Sea Sun Greetings from Nigel


Lucky last to the party is Nigel,
he's celebrating a sunny summer Christmas at the beach
with Shazza and Steve.


Nigel is a pre-coloured digital stamp from the Sandy Christmas digital stamp set by Beccy's Place.  I sized the image in Silhouette Studio to fit on an A2 card and added my very own "Sea Sun Greetings" sentiment.  The two card panels fitted perfectly on Letter sized cardstock, so all I had to do was send it to print, slice the sheet in half, score the two panels in half and soon had two fun summery Christmas cards.


Here are the all the sandy folk together.


Beccy has ticked ALL the boxes with this digital stamp set,
the images are perfect for summer Christmas celebrations
and the pastel colours are delightful too.

~~~*~~~*~~~
"Nigel" pre-coloured digital stamp
300gsm smooth white cardstock
scoreboard & bone folder - to form the card

~~~*~~~*~~~
I have entered my cards in the


Sea Sun Greetings from Steve


Now it's time to introduce you to Steve,
he's celebrating a sunny summer Christmas at the beach too.

Steve is a pre-coloured digital stamp from the Sandy Christmas digital stamp set by Beccy's Place.  I sized the image in Silhouette Studio to fit on an A2 card and added my very own "Sea Sun Greetings" sentiment.  The two card panels fitted perfectly on Letter sized cardstock, so all I had to do was send it to print, slice the sheet in half, score the two panels in half and soon had two fun summery Christmas cards.


~~~*~~~*~~~
"Steve" pre-coloured digital stamp
300gsm smooth white cardstock
scoreboard & bone folder - to form the card

~~~*~~~*~~~
I have entered my cards in the